Monday, 4 February 2013

Make a recycled timber chopping board

In my previous post I talked about the native rimu timber that I'd kept aside after we replaced the kitchen in the old house. Rimu is a good solid timber that is perfect for chopping boards. If you're new to woodwork and you want to start with the most simplest project, then chopping boards are your best bet. Making a chopping board can be as simple as just sanding down a 30cm x 30cm (1 foot) piece of solid timber shelving, applying oil and calling it a chopping block. It doesn't have to be fancy.
 
 
I selected a piece of rimu that was 21.5cm (8.5 inches) wide. The kitchen in our old house was built before New Zealand switched to metrics in 1969, so the rimu pieces I've collected are some slightly odd sizes compared to the new timber that is sold today in metric sizes. The end of this piece was pretty rough with a broken corner so I started out by sawing off that end with the mitre saw. I chose a 45 degree angle for the edges of my chopping board because I like that look, but there is nothing wrong with just doing a standard 90 degree cut if you prefer (or if you don't have a mitre saw to cut a 45 degree angle). You can use a hand saw and mitre box for these cuts, but given that rimu is a hard timber, it would have taken me quite awhile to hand saw through it.
 
I used a power sander to sand the surface and edges of my board, but that was mainly because this piece had old oil marks and dust on it from the garage. After a good sanding I put it through the dishwasher to make sure it was really clean. I waited until it was fully dry before oiling it.
 
Next I mixed up 50/50 of raw linseed oil with turps in a jar and applied this to the board using a cloth. Once the oil mixture had been throughly worked in, it looked like this:


Chopping boards make a great gift for people. You can even engrave their name onto the back of it using a wood burning tool. I don't own a wood burning tool but apparently they are quite cheap to buy and it would really a personal touch to have "Dear _, Love _" on the back of it :)

Making rustic looking shelving out of recycled timber


Our old house was built in the 1960s and the kitchen cabinets were made out of native rimu timber. We replaced them with new melamine cabinets and I kept the native rimu timber to use for decorative shelves and chopping boards in our new home. Some of them had a few stains where oil had been spilled over 50 years of use, but that's part of the charm of using recycled timber. They also had screw holes in the ends and sides, and paint on some of the surfaces.
If you don't have used timber lying around like I did, you can buy it from a builder's recycling store. They have piles of used native timber and it doesn't even cost much. In Palmerston North there is the Rusty Nail timber recycling store in Longburn, but just check the internet for the nearest builder's recycling store to you.


I've used the Icon power sander because its inexpensive and does the job perfectly well. I used a medium sanding sheet (P80) and sanded the timber until the paint was removed and the oil stains were looking less obvious.

Next I filled in the old screw holes with timber filler and waited 30mins for it to dry before sanding. The timber filler is a pine wood colour, so I used tiny bit of wood stain to colour the filler a darker shade to match the rimu a little better.
ps - if you're going for the rustic/farmhouse shelving look then you might want to just leave the old screw holes unfilled to add to the charm :) Our house is fairly modern so I didn't want to go too rustic in case it looked out of place.


I mixed raw linseed oil and turps into a 50/50 mix in a jar and used a cloth to rub the mixture into the wood. It brings out a beautiful warm colour in the native timber:

 
These metal decorative brackets were $8 each at the hardware store. I love their rustic look and think they go well with the old recycled timber.
 
 
I didn't want the gold metallic colour of the screw heads to show up when the brackets were fitted to the wall, so I placed the screws into the grass and gave each a quick spray with black spray paint. It worked really well. The screw heads aren't visible on the wall at all. I made sure that I drilled all of the screw holes into the studs.

 
And here is the finished result. I really don't like the boring beige of the walls, but I think the rich colour of the timber will stand out if we add a warmer light clay colour to the walls later on. To make the shelves look a little more interesting, I placed the bottom one a little off to the right and the top is off the left. :)
 
 
Here is the shelf after I added a few more colourful items to it:
 

Sunday, 3 February 2013

DIY fabric wall artwork

Sometimes I can't be bothered sitting down and painting a picture on a canvas, so today I've made wall artwork using fabric stretched over a canvas instead. It didn't take long - maybe 15 minutes in total.
 
I had this fabric left over from something I'd made years ago. I love the reds and oranges on it. Its a stretch fabric, but you can use any fabric you want to create your wall artwork.
 
You'll need:


- A canvas. Just buy the cheapest since it will be covered anyway.
- Fabric. Needs to be big enough to cover your fabric plus another 2.5cm (one inch) or so extra on all sides.
- A hot melt glue gun and spare glue sticks.

1. Place your canvas on the fabric and cut around it allowing 2.5cm extra on all four sides.
2. Iron your piece of fabric to ensure it is smooth and free of wrinkles.
3. Apply glue along one of the edges on the back of canvas and use your fingers to press the edge of the fabric into like this:


4. I then stretched the fabric over the canvas and glued down the opposite side. Be careful when stretching the fabric over the canvas - you want it to be tight enough to be free of folds and wrinkles, but not so tight that the pattern is stretched and disfigured.
5. Now glue down the last two sides, tucking and gluing the corners like this:

 
The hot glue dries really quickly. Now all you need to do is pull off any those glue strings that can form when you're working with glue guns, and its done! This is mine looked like on the back - its not perfect but no one will see the back.
 
 
And here is the finished result on the wall. I'm planning to repaint this room and add a picture rail so I can hang artwork neatly. At the moment the wall looks very plain, but at least the bright coloured artwork brings life to the boring wall until get around to repainting it.
 
 
Chris decided that it looked a little lonely by itself so I made two others to go with it :)


Thursday, 31 January 2013

Upgrading the bathroom - Phase 1

When we first saw this house (at the open home) I noticed that there were no mirrors anywhere in the house, not even in the bathrooms. I'd never seen a house that didn't have a bathroom mirror. I've read that in Feng Shui, mirrors are believed to create an unbalance of energy in the house, so perhaps that's why they chose to have no mirrors? Anyway, I had a small mirror that I wasn't using so I hung it up. This is what the downstairs bathroom looked like after we moved in:
 
 
This is after we made a start on replacing the toilet:


Bathroom vanity - before
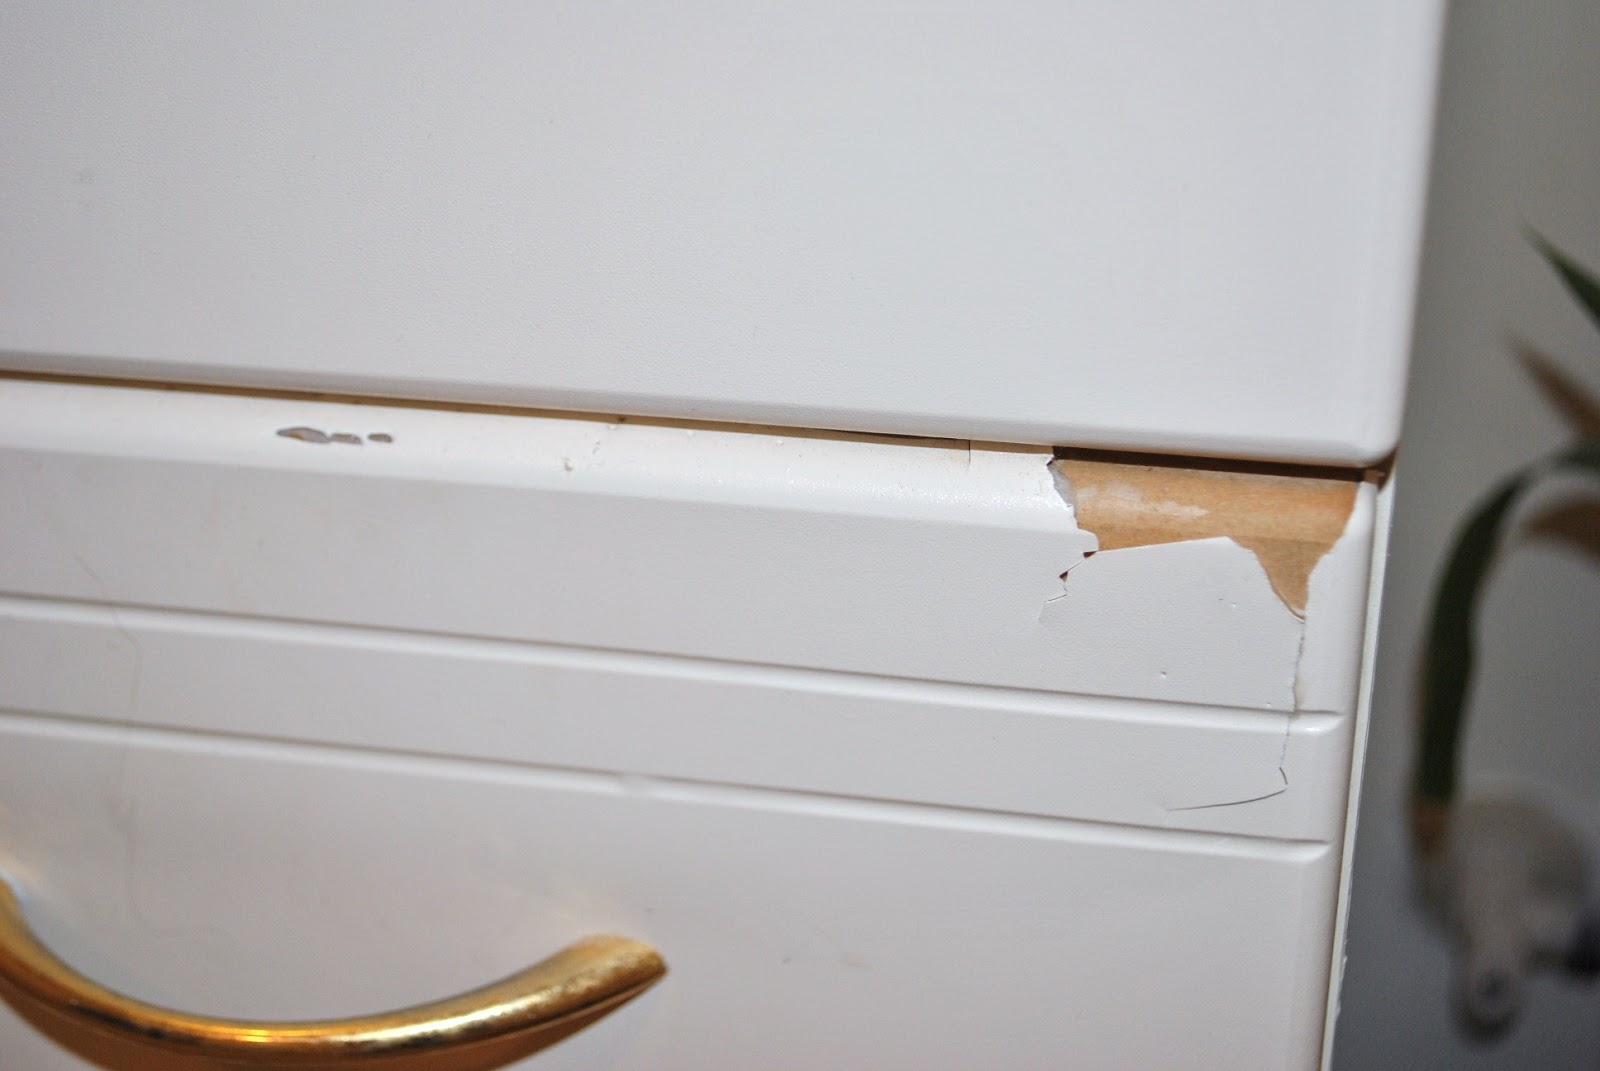
There were several problems with the bathroom, so we made that room a priority. The toilet was leaking, so I changed the ballcock washer, but it still had another leak from underneath the cistern. Chris leaned over to have a look at it and snapped the pipe that feeds the bowl from the cistern, so we decided it was time for a new toilet. Since we were replacing the toilet, we decided it would be a good time to repaint the walls since they were a lilac colour and it made the bathroom look dark. Even the windowsills were painted in the lilac colour, so the windows looked small and dark. I hate seeing the crack on the laminated plastic vanity's draws, but that will have to wait another day.
 
The last thing we wanted to fix immediately was the extractor fan. It was completely gunked up with dust and looked disgusting, so we decided to replace it with a new fan. That job required an electrician. We replaced the toilet and did the painting ourselves.
 
We chose Resene's Pearl Lusta (a pretty cream colour) for the bathroom. I know cream paint doesn't go so well with the existing beige bathtub and beige vanity, but it will have to do for now until we upgrade those. We chose a waterbourne enamel paint designed for the kitchen & bathroom, since it would need to withstand high humidity and repel mould spores. For the windows we used Dulux Aquanamel in Vivid Gloss White. I chose a gloss white to reflect the sunlight on the windowsill, to maximise light in the room. The bathroom is not on the sunny side of the house so I wanted to increase the light as much as possible.
 
 
The trick to painting with a roller is to always roll upwards on the first stroke. That way any extra paint on the roller will get rolled upwards onto the wall, whereas if you rolled downwards it will drip on the floor. Here is the result after painting the walls and windows, and replacing the extractor fan. After painting, we bought a bathroom mirror from Bunnings for $99. The mirror has a very dark brown (almost black) frame with a silver/bronze colour on the inner edge of the frame.
 
After painting and replacing the fan
The new toilet:
 
Replacing the toilet was fairly easy but it took us about 2 hours since we had never replaced one before, so we read the instructions carefully as we went. The hardest part was choosing the right toilet. I knew our toilet was an S-trap because the waste pipe led into the floor, whereas a P-trap would lead into the wall (the upstairs toilet is a P-trap). Next I measured the distance between the wall and the 'hole' (the hole in the floor that directs the waste into the sewer). Lastly, I noted down whether the inlet water tap was on the left or right side (ours was located on the left side of the toilet).
 
We took our measurements down to the hardware store and the guy pointed out which S-trap toilets would fit our bathroom. We chose an Englefield toilet that has a ceramic cistern. Plastic cisterns are much lighter and easier to install, but I find plastic dulls and scratches with time, losing its shine. Ceramic will hold its shine for years so its worth paying a little extra for.
 
Many of the toilet models these days are built so that the cistern hose can connect on either the right or left side of the cistern (you just plug up whichever side you're not using). Unfortunately the toilet we chose didn't - it only had a right side hole in its cistern (our cistern tap is on the left) so we had to buy a long cistern hose to correct the problem. The last things we needed were a rubber toilet gasket (its upside down in this photo) and toggle wall anchors.

I watched a few YouTube videos (from the US) and noticed that people there use a wax ring (wax gasket). Every country is different so you'll just have to ask the store which gasket is used where you live. Anyway, the bottom (smaller end) of the rubber gasket sits in the sewer hole and then the toilet is placed on top of this (with the S-trap pipe sitting in the bung), so that waste water cannot leak out.
 
Since a ceramic toilet cistern is pretty heavy, and much heavier once its filled with water, we bought two heavy-duty toggle wall anchors. There were no studs in the drywall (plasterboard) where we needed to place our cistern screws, so without studs to drill into, we had to buy strong wall anchors. The anchors are easy to install, but I measured and marked the places twice before drilling to avoid any mistakes.
 
The cistern components were mostly pre-assembled and fitted, so there were only a few things we had to do there. We had to cut the flush button rods to size and fit those in, but that was pretty straight forward. I used an adjustable wrench to attach the cistern hose to the cistern and the inlet.
 
After installing the toilet and turning the inlet tap back on I found that there was slight leak where I had connected the inlet to the new hose, but a little extra tightening with the wrench fixed that problem. One last problem we encounted was that our masonry drill bits completely failed to penetrate the concrete under the lino when we went to put the two toilet bowl bolts in. Luckily the electrician had arrived to replace the fan, and he had a proper concrete drill in his truck so we borrowed that to finish off the job.

Last of all, I applied a line of white caulking around the toilet and smoothed it with my finger. We finished off by applying the caulking to top edge of the bath and around the top of the vanity. The tube of caulk said "white" but it was actually more of a creamy white so it went well with our bathroom. We didn't go around the whole vanity since we're planning on pulling it out and replacing it anyway.
 
Overall, the toilet, hose and gasket only cost us $180, and then we spent about $15 on the wall anchors. We saved a lot of money by not hiring a plumber to do this job, but having said that, our house is fairly modern so exchanging a 1990s style toilet for a 2013 model isn't very difficult. If you have an old house you won't be replacing like with like, since toilet technology has changed a lot of over the decades. In an older house, chances are you'll need a plumber to upgrade some of the pipes before a modern style toilet can be fitted.
 
So this was Phase 1 of our bathroom upgrade. There is still a lot to be done. The bathroom doesn't have a heater, the lino flooring looks worn, the shower head needs replacing, the shower tower (soap stand) needs replacing, and the vanity needs replacing. No matter how much I scrub the vanity sink, it doesn't come clean (another reason I don't like plastic for sinks and toilet cisterns - plastic stains permanently). My plan is to build a timber vanity and stain it a dark brown colour like the new mirror :)


How to fix scratches on an appliance

We've moved three times in the past year and a bit, and our poor washing machine ended up with a lot of scratches on its paint:


This is a simple problem to correct with an acrylic lacquer spray paint. We've used Dulux Spraypak Appliance White - an acrylic lacquer especially designed for touching up scratches on fridges, washing machines, dishwashers, laundry tubs, or any other white appliance.


Its easy to use. First, clean the area to remove all dust and dirt. Then spray onto the scratches in the same method that you'd use any spray paint. If there are any areas that you don't want spray painted, simply use marking tape to protect these areas, or for larger areas I just use newspaper taped onto the area to protect it from paint.

Be very careful to only use a light spray or you'll end up with a gluggy mess. Its easier to do it lightly and apply more later, than apply too much and have to clean off gluggy paint. Once it was thoroughly dry, I sprayed a tiny bit more onto some of the really bad scratches that hadn't quite been covered. And here is the finished result:

Wednesday, 30 January 2013

Healthy honey mustard mayonnaise


Now that we have five hens, we need to think of more ways to use up the fresh eggs in our cooking! We were out of mayonnaise once so Chris suggested we try a homemade recipe. There are a few variations based on your preferences, so I've listed these below. Please note that mayonnaise is made using raw eggs and therefore you must be confident that the eggs you are using have come from a good quality source to avoid salmonella poisoning. We make our mayonnaise from the eggs that we collected that day so they're nice and fresh.

For mustard, we use a strong-ish tasting wholegrain mustard so we only use 1 tbsp. If you are using a mild mustard, you might like to use 2 tbsp. For vinegar, we vary between using white, malt and cider vinegar. You can also use lemon juice instead. We use a light olive oil for our mayo. We once tried an extra virgin olive oil but it tasted bitter.

Honey mustard mayonnaise
2 fresh eggs (whole, not just the yolks)
1/2 teaspoon salt
1 tablespoon of your choice of mustard
1 tablespoon of your choice of vinegar (or use lemon juice)
1 tablespoon of runny honey
1 3/4 cups of olive oil

We use a sealable plastic container to make it in so that we can store ours in the fridge after we make it. We add all of the ingredients (except the oil) and use a stick blender to process it all until its well mixed. Now pour the oil in gradually as you blend the mixture. Once all of the oil has been added, you'll have a smooth mayonnaise.

 
If you've never made homemade mayo, you'll notice that its more yellow than the white mayo sold at the supermarket. This is because store brands use powered egg or an egg substitute for shelf longevity. Your homemade mayo should last up to two weeks in the fridge, but it depends on how old the eggs are that you have used.

We lavish our mayo on potato salad, bread, vegetables and whatever else we feel like.

ps - olive oil is very good for you. I was recently reading about Jeanne Calment, a French woman who lived to 122 years old (the oldest recorded in history). She credited her longevity to pouring olive oil on her meals.

About our new house

We moved into this house on 27th Nov 2012 (two months ago). Its a pretty large house at 270m2 (2,906 square feet) for just the two of us and our ex-racing greyhound (Milo) who we adopted 6 months ago. The land size is 1390m2 (a bit over a third of acre), located near the beach so we have a sunny climate with sandy soil. Its the middle of summer now (January and February are the hottest months) and our poor veggie garden is getting scorched from the sun. The lawn is brown and crispy from lack of rain.

One strange thing about this house is that despite the large size of it, it only has three bedrooms. Oddly it was built to have three living areas and three bedrooms, plus a loft area. Judging by the flowery wallpaper that we found behind the toilet cistern when we replaced the downstairs toilet, I'm thinking that the couple who had this house built were retired people who wanted a large place for their hobbies but didn't need many bedrooms. In the future we'll turn it into a four or five bedroom house.

The weirdest thing about this house is that its only 14 years old, but it wasn't maintained well or finished properly in the first place, so its going to be a big project for us over the next few years. Here is some evidence:

Laundry room
Rotten laundry room skirting boards
The laundry is one of the worst rooms in this house. I secretly suspect it may be one of the worst laundry rooms in the world even. I did a Google search for "ugliest laundry rooms" and I'm pretty sure ours was up there in the top three. I often see laundry rooms with signs hanging up saying "wash" or "laundry". I'm thinking of making a sign that says "world's worst laundry room". The photos above don't do it justice since I haven't taken a close-up photo of the DIY tile job above the laundry tub. They've taken (very) old '60s tiles and instead of using tile adhesive and grout, I think builder's fill was used because its as hard as concrete. Each tile has been added separately (and unevenly) so it must have taken them ages. Its going to take me ages to get each of those back off.

The previous owners had let their washing machine leak so the skirting boards in the laundry are completely rotten. They had conveniently covered this up by placing things in front of the wall, so we didn't know about the damage when we bought this house. Pretty bad for a house that is only 14 years old, right? We've decided that we'll have to leave the laundry room until last, because we need to use the laundry tub to clean our paint brushes from painting the rest of the house.  

The garage was so full of the previous owners' possessions that in some places items were piled up to the ceiling. When we moved in, we were pleasantly surprised to discover that the garage actually has two windows, but one was just completely covered up by junk. Its actually a sunny area rather than the dark, scary garage we thought it was when we viewed the house. The plasterboard in the garage looks like a DIY job because there are some large gaps in many places. These weren't plastered or painted, and the plasterboard has become grimy and stained.


The downstairs bathroom was pretty bad so we started tackling that room shortly after moving in. Mainly because the toilet was leaking, and partly because the bathroom was dirty which is never a good look for a bathroom. The kitchen is rough but has four pantries, so there is plenty of storage space. We'll leave that room for now.

There is a loft room above the garage that is completely unfinished. It doesn't even have plasterboard walls, just exposed timber framing. We want to get onto that pretty soon. When our offer on the house was accepted, we hired a building inspector to check over everything to make sure the house was safe. He took me aside and said "You do realise that this house is a little...unfinished?". I laughed and said I did notice the timber framing with no plasterboard on it, so we know what we're getting into.

The third acre section was massively overgrown so we spent our Xmas break sawing and cutting so that we actually had access to the area that we wanted to put our pet hens in. It took hours of cutting branches and digging up roots. We've taken several car loads of branches to the landfill, but we still have another large pile looming there waiting for us.

Next door there is an abandoned house with long grass growing on the front lawn. The house looks about 80 years old and we refer to it as 'The Haunted House'. Apparently some nutcase relocated it there 10 years ago after getting permission from the neighbours to put a relocatable home on the empty section (the neighbours agreed thinking it was a new relocatable home). Its odd because all the other houses on this side of the street are modern (built within the last 15-20 years), and then there is this haunted looking abandoned house there amongst the modern houses. I've planted two flowering cherry trees on our property so that when they reach their full height (5m), they'll mostly hide the ugly house with beautiful cherry blossoms. They'll take 2 years to get to that stage though.